Before you start creating a custom circuit board you should ask yourself following:
What do I want it to do and would it be more convenient to just buy a pre-manufactured board?
Will it fit into the designated area given?
Can it be expanded or modular incase something goes wrong/right?
Is it for show as well as function or just for the sake of performing a task?
One trick that I have learned in aiding the process of designing the circuit is to lay a piece of paper on a desk with a pencil and a big eraser. Draw the components on the scratch paper taking no consideration on the size, shape, or layers. Now just start drawing circuits starting with the most crucial components while isolating specific functions as much as possible. For instance, if you were creating a power supply you would have the power input and transformation as one function, rectification as another function and finally filtering as the final stage. Doing this will also help if in the case something goes wrong, it will be much easier to troubleshoot, if there is no power output then you can rule out an entire sector of the motherboard in seconds.
When you are satisfied that all the connections are complete, check them again, design flaws are common and can not be undone without ugly and maybe expensive work! The circuitry can be fixed with wires later on but can be a headache if you have already started to mass-produce the circuit.
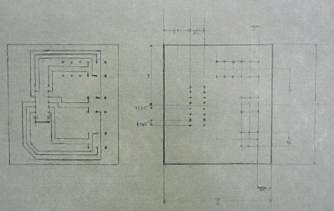
Now that you are satisfied completely you will want to refine the circuit on another piece of paper; drafting skills are a plus when performing this step but it is only important that you can understand what you are doing. Since you are doing this your own way it is also your choice as to what rout you are going to do, use exact measurements for all components or to lay the pieces down and mark where the component leads contact the paper. Sometimes measuring everything out can produce mind-boggling errors if you don't have the proper equipment so you might want to try a combination of the both.
|
 |
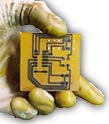
It is also a good exercise to see how small you can make the circuits, even though it can be more expensive and time consuming to do so, it also gets the innovative side of you out.
|
|
There is not much to be said here but this step is no less important then any of the others. At this time you should have some idea of what the dimensions are, so now you will take out the circuit board and leaving about ¼ of an inch for error correction begin cutting. The trick is to cut the required amount of pc -board out of the larger piece and still leaving enough for an exact duplicate piece or scrap for future projects. Cutting should be done with a vice and a fine blade hacksaw, I prefer to use masking tape to add a level of padding between the circuit board and the vice so that when I reuse the scrap I wont have any problems with scratches or cracks. Now with a file, sandpaper, or sharp cutting device, remove the metal shards still lingering from the hacksaw blade.
|
With you design plans at your side transfer the drill points over to the circuit board making all measurements for the drill points from one specific side or corner. This because not all cuts that you will be make will be a true right angle. This is not so much as a problem when you are making simple devices such as blinking light shows and simple electronic experiments but will be a problem when you start making amps and prototyped items. This way even if all the angles are wrong at least the circuits, drill points, and components will align which is the most important aspect.
|
If the drill points that you are making are nothing more then holes for resistors, wires, and such devices that do not require any specific measurements and you can get by with just estimating where the holes are to go. Likewise when you are transfers the circuit transfers over then you can also estimate where they are to be placed.
|
|