Would you like to make this site your homepage? It's fast and easy...
Yes, Please make this my home page!
With the circuit held down with some sort of tape, magnetic clamps, or what ever you would like to use, start drilling the holes. Remember slow speeds "hand rills" are for double-sided circuit boards and high-speed drills "electric drills" are for one-sided circuit boards. This will take some time to complete depending on the complexity of you project but you should always take you time, if it takes 2 weeks to complete then it takes 2 weeks to complete.
With two sided circuit boards, if you were to attempt to drill the holes for the circuits with a standard drill bit for the components then you would quickly find your project a total waste. You might find that your drill bit is running off and gouged a pit in the center of your board, if it got through then most likely it has torn the copper skin off the back side. I would imagine that if you had a specialized drill press for circuit boards then this would be fine but remember, this is a house hold project and not everyone has a 15,000 computerized drill press at home.
|
|
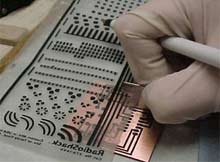
There are two basic ways of making a circuit board with conventional tools, the first way is to draw the circuits out with a permanent marker and the second is to use dry resist transfers. These can be found at your local hardware store. I have chosen to use Radio Shack brand because they contain all the shapes needed in order to complete this project.
This method is one of the most dangerous ways of making a circuit board if you are not careful. For example, the ink does not bond with the copper perfectly and if the pen gets too dry then it will start taking more ink off then it puts on.
Using the etchant resistant transfers does require some skill with the eyes and hands, what I do is flip the transfers over so the sticky side is up and place it over the circuit board and mark the length that I need. I then take a utility knife or razor blade and cut the strips to the specified length and turn it over once again. The two strips are still connected to the plastic paper because they are both sticky and require force to transfer over the strips. I then flip the plastic paper with the strips sill on it and place it over the circuit board. Here you will align the custom cut strip with the location where it was designed to be and taking a ball-point pen, use about .5 pounds of pressure to transfer over to the circuit board.
|
|
|
|

|
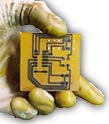
When you are satisfied with the outline of the circuits poor the etchant solution in a plastic or glass dish approximately 3/4 inches high so there is sufficient liquid on the bowl to dissolve the copper skin. Now place the circuit board in the dish and oscillate for approximately 20 minutes or until all the unwanted copper is dissolved.
|
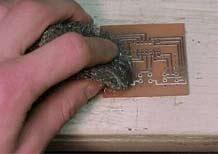
By now you should only see brown board and black likes left over from the etching process, to clean up the board place it under water and scrub for 2 minutes to stop the chemical reaction. To remove the black lines and expose the copper lines simple take steel wool or a fine grit sand paper and scrub away.
|
|
Home |
Contact us |
Our History |
Link to us |
Relations
A Passion Production ©opyright 2000